Let’s discuss the process of how to design appealing and memorable oc characters with a story. I broke down this process into 8 distinctive steps that you can follow along.
We will be drawing on the insights and techniques shared by Magdalina Dianova, a talented character designer based in Bulgaria. She has worked in the animation industry for over six years and definitely knows a thing or two about this topic!
In her course on Domestika, “Drawing Appealing Characters with Personality”, Magdalena shared many tips and tricks for creating engaging and visually appealing characters. We will explore these ideas in more detail throughout this article.
By the way, you can get Magdalena’s course for yourself at 10% OFF HERE, with our blog’s unique discount code YOURARTPATH-10.
(Code is valid with any offer except Domestika Plus and Packs)

So if you’re ready to dive into the world of character creation, grab your pencils, paints, iPads or drawing tablets and join me on this journey!
Here’s what we will get done today:
Step 1: Generate Your Character’s Backstory
There are many ways to go about this step, but we will begin by Following Magdalina Dianova’s character interview sheet.
And to spice things up, I’ll use a random prompt generator to spark ideas. I found this random website that allows you to generate certain prompts: www.52prompts.com, and I used it to answer a few of the interview questions.
This was before I built my own OC Character prompt generator! It’s super cool and completely free. Check it out!
For example, I received prompts that suggested that my character is studying to become a mechanic and works part-time at a candy shop. I would’ve never picked these two traits out myself! This can be a fun and creative way to develop unique and exciting character ideas.
Or you can always answer the questions yourself and have more control over the final result of your oc.
Once you have your character prompt, you can flesh out your character’s personality by considering their strengths and interests.

For example, in this case, I chose that my character is brave, fun, strong, energetic, and enjoys spending time at the gym and racing. That means she might also be drawn to speed and adrenaline activities, such as car racing.
For dislikes, I picked feeling lonely and watching TV. By considering these aspects of the character’s personalities, you can understand who they are and what makes them unique. After all, we are all made up of a variety of traits that sometimes even contradict each other!
It’s also important to consider the character’s flaws or weaknesses.
In this case, the character tends to speak without thinking and has “no filter,” which can lead to problems in her interactions with others.
Also, she is easily upset by fake people and bullies, which can be a source of sadness for a character, but in this case I think she will just get more angry and fired up.
That’s just the kind of character she is, you know? Ready to protect and fight against injustice.
These are all important traits!
And by considering both the character’s strengths and weaknesses, you can create a more well-rounded and believable character.
Overall, creating a character requires some level of creativity, and a willingness to experiment and try out new ideas, even if they don’t seem to fit tight away. By starting with a random prompt, at least for some traits, and then fleshing out the character’s personality and appearance, you can create a fully realized and engaging character!
Step 2: Create a Mood Board
The next step will be to create a mood board for our character, which can be a very helpful step in the design process!
A mood board is a collection of images that help convey your character’s overall vibe. It can include pictures of clothing, hairstyles, and images that capture the character’s personality and interests. Imagine their daily life and the activities they could participate in, as well as objects, colors, situations or emotions that represent them.

You can also include written descriptions of your character or notes you want to remember to help you keep track of their personality and background. Think of it as their personal Pinterest board of all of the things that represent them. It could really be anything you want!
For example, I included images of candy stores, mechanic girls, car racing, and other activities relevant to my character’s interests and personality.
Creating a mood board can be a helpful step in the character design process!
To create one, you can use a platform like Pinterest or an app like VizRef (for iPad) or PureRef (for Windows) or simply save all images in one folder on your device. Collecting and organizing your visual references will make it easier to keep track of all the elements you want to include in your character design.
Once you’ve completed your mood board, use it as a vibe reference as you begin to sketch out your character.

By the way, my Patrons get access to my digital art courses:
- Getting Started With Digital Art
- Drawing Anything
- Fun Perspective
- Light and Shadow: Rendering in Digital Art
- And more!
- Check them out HERE.
Step 3: Design Character’s Shape
In this third step, we are finally going to draw. Yay!
When it comes to designing a character, the shape of their body and limbs can play a significant role in conveying personality.
It’s best to have a few variations of your character’s idea at first, so you can decide which one you want to improve and add details to later on. To get started, experiment with different poses and proportions.
For example, try creating a character with an elongated or squashed figure, one with more round, triangular or square shapes.
As you sketch out your character’s body shape, think about what each form might communicate about the character’s personality and style. An elongated figure might suggest elegance or grace, while a more boxy or muscular shape might convey strength and athleticism. By considering the character’s overall shape, you can establish their visual identity and create a character that feels unique and memorable.
You might also want to consider the character’s overall silhouette and if it’s recognizable on it’s own vs boring and generic.
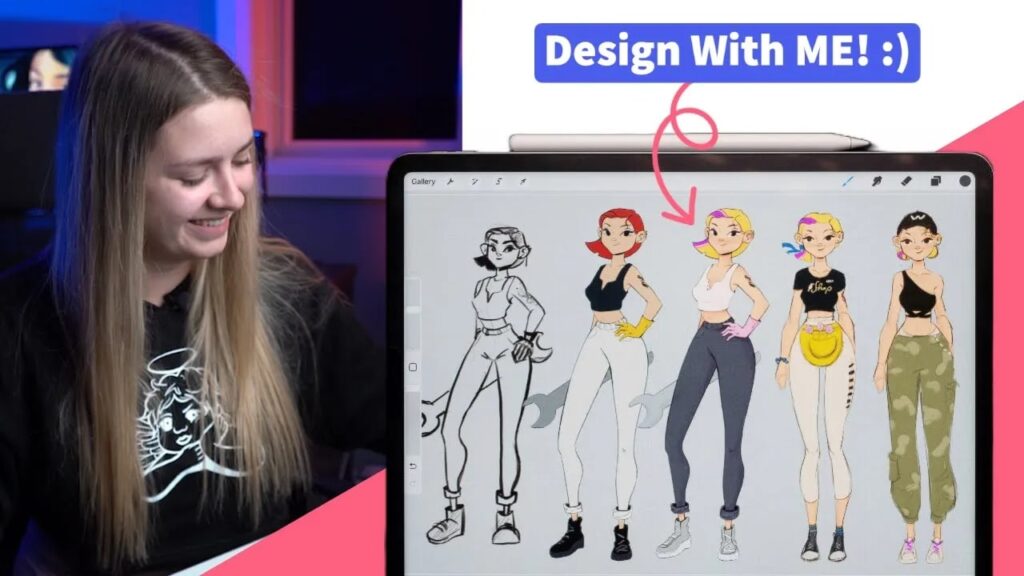
In my case, I started by sketching out four different variations of the character, each with a different body shape and proportions.

The first variation is a more generic shape with boxy shapes, wider hips, and bigger legs but muscular arms. The second variation features a more petite upper body and larger bottom area, creating a distinctive difference in size. The third variation is very elongated, with stretched-out shapes, while the fourth variation didn’t quite work out as well.
After looking at all four variations, my top two favourites were the first and third options. Ultimately, I chose the first variation because it fits the character description we created in Step 1 much better.
Viewers must be able to have an idea of who the character is just by looking at them, without any prior knowledge of who the character is!
Step 4: Design Color Combinations

Now that you’ve picked the initial design for your character, it’s time to come up with the perfect color combination for them. What colors represent their vibe?
Are they a dark and mysterious persona, or are they all sunshine and rainbows?
At this point in the process, once again, it can be helpful to play around with different color combinations to see which one best fits the character’s personality and style. I suggest you quickly color in the character with various colors that you think might work, and you may be surprised at which result you choose in the end!
There are a few different approaches you can take when choosing colors for your character:
- Use a limited color palette, choosing just a few colors that you’ll use throughout the character’s design. This can help create a cohesive look and feel for the character.
- Go for a more varied color palette, choosing a wider range of colors to use in your design. This can be a great way to add depth and interest to your character’s appearance.
- Use similar colors throughout, with small pops of colors in certain parts. This keeps the design cohesive but appealing to look at.
- Follow color theory to build your own color themes.
- Just throw in colors and see what works. (my personal fav. lol)
Different colors can evoke different emotions or moods, so it’s worth considering as well. Check out this article on color meaning for some inspiration.
Be bold and play around with different color combinations to see what works best for your character and their personality. And don’t get lazy thinking, “I already have the perfect colors for them,” because you never know!
Step 5: Finalize The Design

Now that we have the character description, rough character design and the color palette we chose, it’s time to bring this character to life! Make sure everything feels just right by making final changes, tweaks, and adding any extra details you think are a must.
And with that, we have our final character!
I really love how the pops of pink add a bit of flair to the design, and the fire tattoo on her shoulder truly gives the character a sense of personality. Overall, I’m excited to continue working with this badass girl and take her to the final step in my process.
Step 6: Create Situational Clothing
“What is situational clothing?”, you might ask and that’s a great question!
I actually came up with the name because I think it works out so well! You see, designing different clothing for your character is a regular part of the process, but only now I understand (I think) how to do it properly.

Don’t just come up with any random clothing for your oc character. Instead, imagine what situations they would be in often and what they would wear in those situations?
This way, you stay true to your character’s identity and create “situational” clothing for them.
So in this article section, we’ll explore how to design different clothing for your character based on the situation they’re in.
One way to do this is to consider the character’s job or hobby. For example, during our prompt creation, we figured out that the character works at a candy shop, she is studying to become a car mechanic and enjoys car racing. These activities will definitely influence the clothing choices for your character.
You can also think about the character’s personal style. Maybe they like to dress in all black, or they’re a bit more trendy and like to mix and match different patterns and colors. Whatever style you choose, make sure it fits the character’s personality and situation.

For the candy shop outfit, I gave the character a bright yellow apron to match their yellow hair, as well as beige pants and blue tints in her ribbon and socks to add some color variation.
For a night of car racing the outfit includes a cap hat, stylish pants, and a tight crop top. And I styled her hair in two buns, giving the character a total of three different hairstyles to choose from.
By considering your character’s job, hobbies, and personal style, you can create a range of different outfits that help your audience understand who your character is and what they’re all about.
Step 7: Place the Character in Situations

In the course I mentioned previously, Magdalina Dianova also puts her character in different situations they could be in. I think it’s a wonderful way to bring your character to life and see them in action!
I haven’t done this step for the character (yet), but in my mind, she is wearing her situational clothing to all sorts of fun events!
If you want to see how Magdalina approaches this hefty job, you can watch her whole process in this course, unit 3 on drawing poses.
And don’t forget to use the code YOURARTPATH-10 for an extra 10% OFF on TOP of any ongoing offer.
Step 8: Design a Character Sheet
Designing a character sheet is another widespread practice that helps you solidify the character in your mind. It allows you to map out all the details of your character in one place, from their physical features and personality traits to their backstory and motivations.
A character sheet can be as simple or as complex as you like, but it’s essential to include all the key details that will help you bring your character to life.
You can also make a character design sheet. Check out the link on the left to see 100 of some very inspiring modern ones!
Character sheets also often include characters’ different facial expressions. Although I haven’t done it for this character, I’ve done some explorational character sheets for this other project I was working on.

“Manga Drawing Challenge” – I set myself a challenge to come up with characters, story, and draw 32 manga pages in 7 days! It was super intense, read the article or watch my YouTube video to see how it went.
By thoroughly fleshing out your character sheet, you’ll be well-equipped to bring your character to life in not only your illustrations, but comics and animation as well.
BONUS STEPS
Watch Me Design A Character (Video)
The article you were reading came about from a video I posted on my YouTube channel. You can watch me go through all of the steps we discussed in the video below:
Get “Drawing Appealing Characters with Personality” Course
The tips and process I’m sharing with you came from me going through the “Drawing Appealing Characters with Personality” course. It was a wonderful experience as I really enjoy learning from other artists!
This course is taught by Magdalina Dianova, a self-taught freelance character designer from Bulgaria. She has worked in the animation industry for the past six years, creating characters for clients such as DreamWorks, Spin Master, and 3D total.
Magdalina learned to draw and design characters through a combination of studying art books and taking online courses. Her online presence has helped her get discovered by clients and build a successful career as a character designer.

Magdalina Dianova’s course on dynamic character design covers everything from anatomy and color schemes to gestures and clothing design. With over 28,000 students (at the time of writing this article), the course has proven to be a popular and valuable resource for artists of all skill levels.
No previous experience is required, and you can follow the course using digital or traditional mediums.
The course project, in which students create their own character sheet, is a fun and rewarding way to put your newly acquired skills to the test.
So if you’re interested in bringing your characters to life and telling their stories through design, be sure to check out Magdalena’s course on Domestika. (use code YOURARTPATH-10 for 10% off).
Useful Websites
Check out the best resources for artists I’ve compiled over the years. They include learning websites, art books, tablets and other art tools.
To draw great stylized characters, you should understand human anatomy. I suggest practicing a few minute sketches on one of the websites mentioned in the article below, or by studying from art books.
- Best 9 Free Pose Reference Sites To Practice Figure Drawing Online
- 14 Best Figure Drawing Books for Beginners
Hope you enjoyed this article! Make sure to share it and save it to your Art related Pinterest board for future reference. Keep creating!