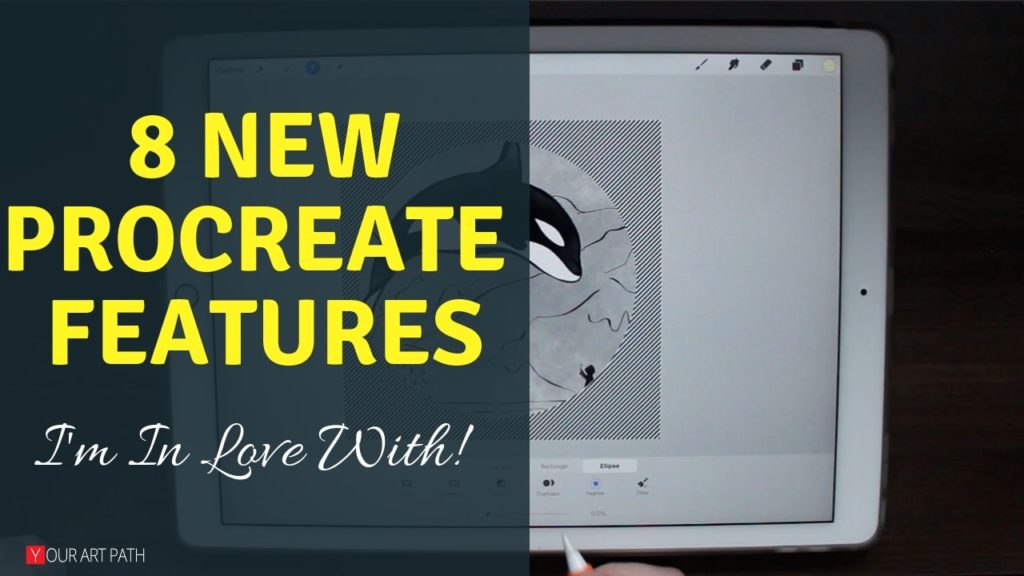
I love Procreate!
Procreate app, together with my iPad Pro completely substituted working on a tablet for me.
And I’m really excited to go over the Procreate 4.2 Update and the 8 New Procreate Features from it 🙂
I also made a video about them if you would rather watch than read, which will be linked in a moment.
But first,
These are free resources that I want to share with my fellow Procreate Artists.
Also, if you would like to learn more about Procreate from me, then check out these pages too:
- 10 Procreate Tips and Tricks – Things Every Procreate Artist Needs to Know and Do
- 18 Procreate Hair Brushes for Believable Hair Painting
- Procreate Reference Layer Tutorial + Color Drop (Video)
- Master Procreate App – Course
Now, let’s dive in!
8 New Procreate Features
Watch the video below, or read the article !
#8. Additional Brush Settings
In the New Procreate 4.2 update, there are some additional setting for brushes modification.
In particular – Stroke Tapper.
With it, you can modify how your brushes perform at the beginning and at the end of your line.
You can adjust it based on the “Pressure Tapper” that changes the performance of your Pen, or “Touch Tapper” that’s great for those who paint with their fingers.
 1")
It’s a great tool for those who are making their own brushes or love experimenting!!
#7. Gallery Preview
The option “Preview” appears in your Gallery Overview when you select a few single artworks or even stacks!
 2")
It allows you to look at your work side-by-side without opening or exporting it. It’s a great tool if you want to flip through your work as though you are flipping through pages of your sketchbook.
“Preview” is also a Bonus for those who create comic pages in Procreate! If you arrange your comic strips in a particular order side-by-side inside a stack, then you can “Preview” all of them and simply read through it.
I find it fascinating!
#6. Interpolation
Interpolation affects how the app calculates the additional pixels that are created.
And now we have full control over it!
There are 3 options you can choose from:
- Nearest Neighbor
- Bilinear
- Bicubic
I suggest you watch that part of my video to see the difference each of these options makes or to go ahead and experiment on your own!
So I took an artwork, duplicated it 3 times and zoomed in using different interpolation every time.
Here are the results:
 3")
As we can see, there is definitely a noticeable difference with these 3. So, when in doubt I suggest going with Bicubic.
#5. Additional Selection Options
The selection tool feature definitely improved with this new update! Now we are able to select not only automatically and freehand, but also work with 2 new options: “Rectangle” and “Ellipse”.
Quick tip: when selecting with an Ellipse, tap your finger on the screen to make it into a perfect circle!
Another new useful option at the bottom called “Feather” allows you to change the properties of your selection. The higher the feather amount – the blurrier the selection.
 4")
It’s really great for creating vignette effects! Or adding blurry objects 🙂
#4. Canvas Resize
Finally Procreate allows you to edit your canvas size during the process!
I used to copy the entire canvas (Actions->Add->Copy Canvas) and then paste them into a different size file. I still do it when I need to change the size to be smaller, but when making it bigger, I can work from the new feature now!
You can access this setting by going to Actions->Canvas->Crop and Resize.
From there, you will be able to change the canvas size completely or to change it while keeping the proportions, as well as rotating canvas.
Tip: Pay attention to how the layers availability changes! If you make the size of your canvas enormous, you might only have 1-2 layers available. Which won’t be the best unless you work on one layer.
 5")
#3. Liquify Tool (New Options)
Procreate Liquify Tool has been available for a while. Many artists use it to adjust proportions, facial features and so on. But it’s also great for texture, backgrounds and beautiful abstract works!
The most awesome new options are Distortion and Momentum.
When you simply use the “Push” tool, for example, you are just pushing paint around. However, when you add “Distortion” to the mix, the paint acts completely differently – almost as if though it was placed on top of the water!
Have you ever mixed ink or nail polish around on top of water? If so, then you will really appreciate the feel of it!
Momentum changes when the distortion begins and stops. I find it a hard concept to explain, but it feels so much like water!
Just watch the video and play around with it for yourself. It’s really fun!
Crystals and Edge options are also new! They have different properties to them.
Here is how they can affect your canvas:
 6")
Crystals remind me of little snowflake spikes!
And Edge can create an interesting effect by pulling paint from your canvas to one point. Almost as if there were a hole and all of the paint was flowing to it. Or if the paint was applied with a palette knife.
I find it to be great for creating landscapes, or perception of form.
#2. Clipping Mask
Clipping Mask used to be my favorite tool in Photoshop that I missed so much in Procreate!
I found a way to still get my stuff done using Alpha Lock feature (which you learned about if you’ve taken my Mastering Procreate App Course).
But now it’s just so much better that Clipping Mask Feature is finally a part of Procreate App!
How does it work?
Well, if you have any shape you are proud of and want to keep intact while adding values, colors, textures to it – you will use this!
If we want to add something overtop of an object without leaving its edges, we would create a new layer on top with textures and then choosing it to be “Clipping Mask”.
So it takes all of the information from this layer, and clips it on top of whatever is on the layer below it.
So if the layer below it is empty, your textures will have nothing to clip too, and it will just be an empty canvas.
You can add textures, shadows and even images as “Clipping Masks” overtop your objects. Here is what it looks like:
 7")
#1 Quick Shapes
My absolute favorite part about the New Procreate Features Update 2.4 is the quick shapes tool!
Drawing perfect circles, squares, triangles can be pretty hard. Not anymore.
You probably know that if you draw a line and then hold for a bit it straightens itself turning on the quick line feature.
Quick shapes work in a similar way where you draw a shape and hold, then the shape has perfect lines and curves. You can then edit it too!
Here are some examples of using it:
 8")
No more redrawing circles 100 times to get it right, now you can get it right from the first time!
I hope you enjoyed this list of New Procreate Features. Let me know in the comments, what is YOUR favorite Procreate feature?
I would love to hear from you!
And don’t forget to get my 2 Freebies for Procreate Artists 🙂
Cheers,
– Anna.


6 Responses
When I try to resample my image in Crop & Resize, I can’t figure out how to unlock the aspect ratio. I want to stretch my image taller but no wider. Any suggestions? And here’s a big thank you for explaining bicubic and nearest neighbor and such. I was completely out of my depth on that.
Janet, there should be a lock icon! Try clicking on it and you will be able to change the aspect ratio! 🙂 Hope that helps, and thank you for stopping by!
That was so totally amazing!
I’m glad you found this article helpful, Dominique! 🙂
I cannot get the feather to work correctly. No matter what I try, it doesn’t feather all of the way and still leaves a hard edge. Any ideas?
Hey there, so there might be a lot of different reasons for why that is…
– Did you check if you are feathering the right layer? (happened to me before)
– Do you have a duplicate of the same layer?
– Is the procreate canvas size extremely large? (try using feather tool twice)
I would just try using it on a different file and seeing if that works! If so – awesome! Find the bug on the original file. If not – then contacting Procreate support would be my best bet!
Thank you for stopping by!
-Anna