Do you use Procreate? If so, I have a special treat for you!
I found a short tutorial by Chris Haldenby on Facebook and LOVED IT! So I asked him to break his process down for you guys! Enjoy 🙂
Anna, founder of yourartpath.com
Hi everyone, my Name is Chris and I’ve been creating art and animating since I was in school.
I don’t have any formal education in the field but no employer is really asking for a degree, they are looking at your portfolio. So I have taken online courses that help you hone your skills and build better portfolios for this reason.
You can find more of my work over on Instagram @chaldenby.
I have a variety of styles depending on the clients’ needs but when left to my own devices I gravitate towards a cartoony fun style.
The program I used most for illustration and storyboarding is Procreate App.
Having such a robust drawing program for the IPad and the ability to use gestures and the Apple Pencil makes it hard to go back to a desktop with a drawing tablet and not have finger gestures.
I find myself annoyed when I can’t double tap to undo or rotate the canvas with my fingers after accidentally trying time after time.
The IPad is lacking a robust animation program with good drawing tools so when I saw Procreate had implemented GIF exports it got me quite excited!
Here are a couple of quick Procreate video tutorials I created…
NOTE: Learn how to animate step-by-step from Chris with his awesome video course -> click HERE! <- (You can watch it and many other art courses for free for 2 months when you sign up through the link)
HOW TO CREATE ANIMATED GIFS IN PROCREATE APP:
This first video shows you how I set up my layers and turn a pre-created illustration into a looping animation!
Step 1: Create something
I find inspiration from everything at all times! When an idea comes to mind, I often write it down (usually by emailing myself) then get to sketching when I have time.
Step 2: Split the layers that need animating and group them
Find the parts of the drawing that need to move and split them into their own layer.
Step 3: Duplicate your layer groups, each layer group is a frame
In this case, the whole animation is just 6 frames, so I created 6 grouped layers (when exporting I exported at 12 FPS so my 6 frames are looped to make it 12 FPS).
Step 4: Create a guide layer
This is a pre-thought out guide of how you want your animation to look so you can move your assets around to match your guide. When you preview your animation you can turn the guide layer off and hide it in one of your groups.
Step 5: Animate
Now you have everything ready you can use the move tool to slide the assets around to match your guide layer.
A quick tip:
Use a white layer with the opacity set to 70% as an onion skin – This helps you see where your last frame was, you can always create a second white layer and set it so you can see 2 previous frames.

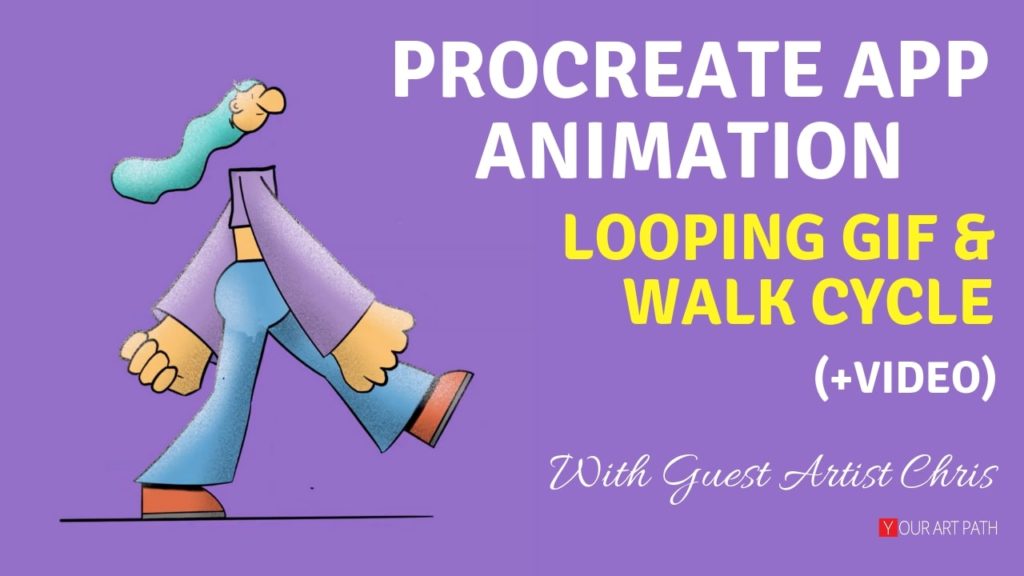
Walk Cycle Animation in Procreate App:
The next video shows a simple walk cycle that was created from scratch to be animated.
Step 1: Create a character.
Create anything but I suggest starting with something built up of simple, easy to animate shapes.
Step 2: Find the simple shapes that make up the character.
This means trace over your character and find the simple shapes that make up its hands, feet, body, head and any other part that needs to be moving. This will help keep your character consistent in the final animation
Step 3: Animate your shapes using layers.
Each layer is a frame of animation
Step 4: Create lines around your shapes.
Once you have your shapes animated you can connect them with clean lines
Step 5: Fill in.
Fill in and colour your shapes
Step 6: Add details shading and highlights.
Use masks to add shadows and details to your character
Quick tip:
Flatten the layers and then you can animate on 24 FPS on 2’s and add some hold frames.
I created the walk in 12 FPS so the whole walk was in 12 groups, I then flattened the groups and duplicated the final layers so there is 2 of each drawing.
This way I can change it to 24 FPS and I can add a hold frame where instead of having 2 of each drawing I can have 3 on a few frames that I want to hold for longer (In this case I used hold frames when his foot contacts the floor).
NOTE: Learn how to animate step-by-step from Chris with his awesome video course -> click HERE! <- (You can watch it and many other art courses for free for 2 months when you sign up through the link)
Save this Pin to Pinterest, I know you want to 😉

I hope you guys enjoyed this quick and fun tutorial by Chris, and do make sure to follow him on Instagram! 🙂
What did you think about this style of content? Should I invite more folks over?
Oh, and don’t forget to get 2 free hair brushes for Procreate below:
Cheers,
Anna


3 Responses
I would love to see more info about creating animation using Procreate! Thank you for this one—it was very helpful!
Thanks Carol! I will see if I can find one more procreate Animation artist to write a tutorial for us 🙂
How to export animated layers as video, same preview which we see in Procreate how we can save it which will support in social media and mails and whatsapp. I tried GIF but I’m losing resolution for it. And mp4 also I’m losing regulation. Even though I’m taking 5000px canvas size